https://pexpeppers.com/blogs/pepper-growing.atomPexPeppers Hot Sauce - Pepper Growing2023-04-23T12:11:53-06:00PexPeppers Hot Saucehttps://pexpeppers.com/blogs/pepper-growing/jalapeno-peppers2023-04-23T12:11:53-06:002023-04-25T09:40:02-06:00A Spicy Guide to Jalapeños Peppers + How to Grow ThemSam Damiano
Jalapeño peppers are a variety of chile pepper from Mexico. These hot peppers have gained popularity worldwide due to their distinct flavor and gentle heat. It's hard to imagine a salsa or guacamole without these peppers. Out of all the Mexican chile peppers the jalapeño pepper is by far the most popular.
Jalapeño peppers are believed to have been cultivated by the Aztecs over 6000 years ago. The Aztecs harvested these spicy peppers not just to cook with, but they believed they had medicinal properties.
When Spanish colonizers discovered these pepper plants they gave them the name "jalapeño", from the word "Xalapa," the capital of Veracruz. The peppers then crossed the border into the United States in the 16th century.
Nowadays you can find jalapeños used in cuisines all over the world, from Thai and Vietnamese to American potato chips.
Two Flavor Profiles
The jalapeños pepper has a distinct flavor when green in color. It is both aromatic and slightly sweet. They are also known for their earthy and grassy undertones. The flavor of jalapeño peppers can be enhanced by roasting or grilling them.
When left on the plant to turn red, the jalapeño pods become sweeter. The amount of heat in the pepper also changes depending on how ripe it is. Are red or green jalapeños hotter? Red jalapeños are spicier than younger green jalapeños. Red jalapeños that are smoked and dried are chipotle peppers.
Jalapeño Heat Level
Are Jalapeño peppers hot? Jalapeño peppers are considered to be medium-hot chile pepper, with a Scoville rating of 2,500 to 10,000 Scoville heat units. This makes them hotter than bell peppers and poblanos on the Scoville scale, but milder than serrano and habañero peppers. The heat level can vary depending on the ripeness and growing conditions of the pepper.
How to Grow Jalapeños
Growing jalapeños is relatively easy. They are a great pepper to grow for beginners, and even advanced growers love to keep these prolific plants in their gardens. Follow these simple steps to cultivate your own spicy peppers:
Step 1: Choose the Right Time to Plant
Jalapeños thrive in warm weather, so it's best to start germinating seeds in February or March. You’ll want to harden them off gradually outside and plant them in the spring or early summer. Jalapeños like warm soil!
Step 2: Pick the Right Location
Jalapeños need a lot of sunlight. Plant them in a spot that receives at least six hours of direct sunlight per day. They can get root rot, so avoid planting them in areas with poor drainage.
Step 4: Plant Your Seedlings
Your seedlings should be planted about 14 inches apart. You can mix your soil with compost or well-rotted manure to provide necessary nutrients for optimal growth. Make sure to till the soil to a depth of at least 12 inches.
Step 5: Care for Your Plants
Water them regularly. They need about an inch of water per week, either from rainfall or irrigation. Fertilize the plants once a month with a balanced fertilizer. Be sure to follow the instructions on the fertilizer package to avoid over-fertilizing.
Step 6: Harvest Your Jalapeños
Jalapeño peppers are ready to harvest when they are firm, green, and about 2-3 inches long. If you want a milder, sweeter flavor, allow them to ripen to a red color. To harvest, simply cut the stem right above the pepper.
Tips for Growing Jalapeños
Pinch off any flowers that appear on your jalapeño plants before they are six weeks old. This will help the plant focus on growing instead of producing fruit.
If you live in a cooler climate, consider growing jalapeños in containers that can be moved indoors during the cooler months.
Wear gloves when harvesting jalapeños to avoid getting the spicy oils on your skin.
FAQs about Growing Jalapeños
How long does it take for jalapeño seeds to germinate? Jalapeño seeds usually germinate within 7-10 days, but it can take up to three weeks for some seeds to sprout.
How often should I fertilize my Jalapeño plants? Fertilize your jalapeño plants once a month with a balanced fertilizer. Be sure to follow the instructions on the package
Ways to Use Jalapeño Peppers
Jalapeño plants can be very prolific. They produce about 25-35 peppers throughout the growing season. You should have decent harvest if you decide to grow your own jalapeños. Fresh jalapeños are great to add to your Mexican dishes. Just slice them or dice them and add them to
Nachos
Tacos
Burritos
Salsa
Guacamole
Quesadillas
If you're not a Mexican food fan, try using your fresh peppers in these unique ways:
Stuff 'em for Jalapeño Poppers
Wrap 'em in bacon and roast them
Make a cabbage and jalapeño slaw as a side or burger topping
Use them to spice up Thai curry or Vietnamese pho
Liven up your beverages, add slices to a bottle of limeade, and pour over ice!
What are the best ways to preserve jalapeños? There are a few ways we like to preserve jalapeños.
For short-term preservation - store them in the refrigerator crisper drawer instead of on the counter. Storing them in paper bags is best. If you've already cut up the peppers, keep them in an air-tight container.
Can the peppers - You can preserve jalapeños for up to two years if you can them properly.
Store in olive oil - If you roast or smoke your peppers, you can cover them completely with oil and store them in a glass jar for about a year. They will soften up the longer they are there.
Make Cowboy Candy - Candied jalapeños = Cowboy Candy. Preserve your peppers in a sugary syrup for a perfect sweet and spicy condiment.
Freeze - Put out the fire temporarily in the freezer! You can store peppers of all kinds for about a year in the freezer if properly prepared. We recommend freezing them on a cookie sheet first before transferring them to a resealable bag.
Dehydrate your peppers - You can use your peppers as a seasoning if you dehydrate them. You can even grind them up into a wonderful powder to add to soups and sauces.
Pickle them - We think the best way to preserve Jalapeños is to pickle them, and then turn them into Jalapickle Dill Hot Sauce!
Are Jalapeño Peppers Healthy?
The Aztecs knew about the health benefits of this pepper variety long ago. Jalapeño peppers contain phytochemicals that are anti-inflammatory and have antioxidant qualities. The peppers are a great source of vitamin C and contain capsaicin, a compound that has been shown to have anti-inflammatory properties. Capsaicin has many health benefits, and may also aid in weight loss by increasing metabolism and reducing appetite.
Other Notable Mexican Hot Peppers
Mexico is full of great-tasting hot peppers that land all over the Scoville scale. Fresh peppers are great for adding spice, color, and crunch to a dish. These peppers range on the Scoville scale ratings from 500 - 350,000 SHU.
Anahiem - the least spicy of the peppers
Chilaca - this dark green pepper is usually used dried
Poblano - the deep green color is a common used for Chile Rellenos
Habanero - the hottest of the Mexican Chiles
Mirasol - "Look at the Sun" is the translation of this pepper
Serrano - these peppers have a more intense heat than Jalapeños
Chilhaucle Amarillo - a rare chile with a tart flavor
Pequin - Pequin peppers are small but mighty, sometimes 10 times hotter than Jalapeños
Chile de Arbol - one of the only peppers to be called the same name when dried
Bandeno - this pepper has complex fruity notes
Puya - a fruity tasting pepper with a similar heat to Jalapeños
Dried Mexican Chile Peppers
Most of the time, when a fresh Mexican pepper is dried, it takes on another name. When these peppers are dried the flavors change. Depending on the pepper, they can become smoky or chocolatey. Some of these peppers end up more citrusy or even tasting like mushrooms. Some notable dried peppers are:
Chipotle (Jalapeño when fresh)
Ancho (Poblano when fresh)
Pasilla (Chilaca when fresh)
Colorado (Anaheim when fresh)
Guajillo (Mirasol when fresh)
Chile Seco (Serrano pepper when fresh)
Chile de Arbol (Same)
Costeno Rojo (Bandeno when fresh)
We love keeping a shaker of dried pepper flakes on our table to add the perfect bit of heat and flavor to our meals. Check out PexPeppers Pepper Flakes to add a shaker to your kitchen table too!
Sauces That Need to be Jalapeño Kitchen
Jalapeño peppers are a versatile and flavorful ingredient that adds a bit of heat to many dishes. We like Jalapeños so much that we use them in a handful of PexPepper Hot Sauces. Head over to the shop and check out Garlic Fuego, Taco Fuego, and our Jalapickle Dill hot sauces. These sauces are the perfect amount of heat for folks that aren't ready to venture into the super hot sauces.
]]>
https://pexpeppers.com/blogs/pepper-growing/how-to-plant-hot-pepper-seeds2020-06-22T16:28:00-06:002020-06-22T19:14:53-06:00How To Plant Hot Pepper SeedsGarrett Peck
This is how to plant hot pepper seeds.
Planting pepper seeds may seem like a daunting task, but have no fear as we are here to help! There are many ways to plant your hot pepper seeds, but we are going to be focusing on the method that has worked well for us.
To start your pepper seeds, you should have the following:
Germinating Pepper Seeds is extremely easy. Just follow this guide and you'll be on your way to hot pepper plants in no time!
STEP ONE: Open Your Rapid Rooters
This is a Rapid Rooter seedling plug. It is made out of composted tree bark and is LIGHTLY fortified with General Hydroponics micro-nutrients so seeds can start strong and stay strong.
STEP TWO: Load Up Your Seedling Dome
We will begin by loading our 72-cell seedling greenhouse with sixteen rapid rooters. After putting rapid rooters into the seedling dome, you will want about a half gallon of water in the bottom tray to ensure your rapid rooters stay moist.
STEP THREE: Place Seeds Over Holes
We will continue by placing one seed on each hole of the rapid rooter. Having two might not be a bad idea if your seeds are older or in questionable condition
STEP FOUR: Push Seeds In
You will want something stiff to push down the seeds into the rapid rooter. They only need to be covered and not pushed the whole way down. After you push all your seeds in, you're done! All you need to do from here is put the 72-cell Seedling Greenhouse onto it's heat mat and plug it in! Please note, if you live in a hot climate, you might not need the heat mat. Your seeds should germinate within 1-3 weeks depending on the type. Jalapeno Types usually take less time than a Habanero or Ghost Pepper Type. Some hot pepper seeds take over a month to germinate!
]]>
https://pexpeppers.com/blogs/pepper-growing/how-to-care-for-peppers2020-06-13T21:11:00-06:002022-06-06T00:31:49-06:00How To Care For and Take Care Of Hot Pepper PlantsGarrett Peck
Introduction:
Over the years we have grown MANY types of chile pepper plants and we are here to teach you what we've learned. This guide will show you how to care for pepper plants, how to evenly space pepper plants, nutrients for pepper plants, and pepper plant nutrient deficiencies as well. Be sure to give this a through read.
How Far Apart Do I Space My Peppers?
Spacing ultimately depends on what type of pepper plant you have.
There are five main types of pepper plants.
Capsicum Chinense (Habanero type; grows very big),
Capsicum Annuum (Thick walled Jalapeno/Bell type; small to medium),
Capsicum Pubescens (Very thick walled; Black Seeds; Medium to Large)
Capsicum Frutescens (Tabasco Pepper/Chiltepin; large to very large)
Capsicum baccatum (Similar to Capsicum Chinense; large to very large)
Once you identify what type of chile pepper you have, you will be able to determine the spacing. Please refer to the chart below to see how far apart to space your chile pepper plants
Capsicum Annuum
1 to 2 Feet
Capsicum Pubescens
1.5-2.5 Feet
Capsicum Chinense (Habanero)
2 to 3 Ft
Capsicum Frutescens
2 to 3 Ft
Capsicum Baccatum
2.5 to 4 Ft
What Nutrients Do I Feed My Pepper Plants?
Nutrients can be such a pain to use. But we have found a solution to that problem! We generally utilize General Hydroponics products like the one shown below. In particular, we use General Hydroponics MaxiBloom with a pinch of CalMag for our peppers.
MaxiBloom has all the Phosphorus and Potassium that a healthy pepper plant requires with just enough nitrogen to keep it happy. Please note that chile peppers do NOT like a lot of nitrogen. An example of Nitrogen Toxicity in pepper plants are dark and glossy leaves or excessively yellowing/dying leaves.
HELP! MY PEPPER PLANT LEAVES ARE CURLING!
Have no fear! Fixing pepper plant leaf curl is a relatively simple process. There are two main reasons why chilie peppers get leaf curl: Heat and Magnesium deficiency. If you are experiencing a LOT of heat (over 95 Degrees F), you should invest in some shade cloth which will filter out about 40% of the sun light. It also doubles as a hail net so your peppers will be protected in inclimate weather.
If you feel your peppers have a magnesium deficiency, you can use CalMag. CalMag will help correct your plant's nutrient lockout and "unlock" the nutrients in your soil so your plant can feed correctly again. You only need about 1 teaspoon of CalMag per gallon of water, it's very strong stuff.
Another use for CalMag is when your peppers flowers drop when your plant is well into maturity. Please note that flower drop on young pepper plants is natural and to be expected.
HOW OFTEN DO I WATER MY PEPPER PLANTS?
Watering your pepper plants is actually very simple. You water when the soil is dry. If you are using pots, you should wait until just before the soil is completely dry.
You can determine this in two ways with no equipment: Stick your finger in the soil until your 2nd knuckle and if it's moist, you don't need to water it. Another way is to remember how much your pot weighs when the soil is dry, if it's light, it needs water. You DO NOT want to wait until your leaves are wilting. Also do not water in the middle of the day or else you will get sun spots on your leaves.
I've waited a long time! How Long Do Peppers Take To Ripen?
This is another issue of what type of chile pepper do you have? below is a rough list of how long it takes chile peppers to ripen after setting fruit. Please be aware that this isn't the most accurate, just a rough guide.
Capsicum Annuum
5-8 weeks
Capsicum Pubescens
6-8 weeks
Capsicum Chinense (Habanero)
4-8 weeks
Capsicum Frutescens
4-6 weeks
Capsicum Baccatum
4-6 weeks
There's Bugs All Over My Pepper Plants! What Do I Do?
Now a lot of people cringe when they hear the word pesticides. However, there are some natural alternatives you can use before you resort to pesticides for your pepper plants.
The picture below is what's called an Aphid. They are little white/yellow/green bugs that eat the pepper plant leaves.
You can get rid of aphids by using a mild solution of dawn dish soap and spray it on the leaves. You should also try to see if you can eliminate any ants that are crawling on your pepper plants as ants farm aphids. Another method to removing aphids and other bugs on your plants is to acquire some ladybugs! Ladybugs are actually a predatory insect that eats aphids and thrips!
Conclusion
Many problems with pepper plants are actually quite easy to fix. We hope this article has given you some answers to your pepper plant growing questions. If you have any other questions, please feel free to contact us!
]]>
https://pexpeppers.com/blogs/pepper-growing/diy-greenhouse-control2020-05-18T13:17:00-06:002020-06-09T11:14:23-06:00DIY Greenhouse Control Box Build Using a Raspberry PiGarrett Peck
Intro
This is a guide to recreate the control box unit I have built for my grow space, lovingly dubbed THE REGULATOR. When I started this project, I had zero experience with: the Raspberry Pi, Linux, python, JavaScript, Node-RED, any kind of web or network interface, or even breadboarding. What I did have rudimentary experience with: basic electronics & circuit design, AC voltage wiring, other programming languages (C++, VB, MATLAB, MS-DOS). While creating the box, I searched for a lot of guides and surprisingly found no one had attempted (or accomplished) what I was out to do - automate the basic functions of my grow space and provide a way to remotely monitor and control the system. It needed to use minimal programming languages which have to interface with each other, and tech savvy gadgets. So, I pulled together the best tools I could find and applied them to growing. I wanted to document what I did in hopes that others who are trying to do the same can have a reference. Or that others who may have thought this project to be beyond them would see it is doable if you’re willing to learn.
At this point in development, the control box has the following functionality:
Monitoring & charting Relative Humidity, Temperature, and calculated VPD
Monitoring & charting of reservoir liquid level (optional)
Manual on/auto and kills witch controls for all devices + master kill switch
Status indicator "lights" for all relay outputs
Light timer, override-able with user input times
Light Dimmer slider (requires PWM-compatible driver) with calculated wattage gauge (not a wattage meter)
Upper and lower limit settings for temperature and RH
High RH activates exhaust (built in dead band to avoid exhaust/humidifier bounce), deactivates humidifier
Low RH activates humidifier, deactivates exhaust
High temperature activates exhaust (overrides Low RH)
Low temperature deactivates exhaust (does not override Low RH)
The finished dashboard UI, including reservoir level sensor.
This guide is geared toward the novice, but not the totally inexperienced. I will assume you have some basic knowledge about electronics, especially AC wiring (seriously, do not mess with AC wiring if you don’t know what you’re doing), basic programming logic/flow, and soldering. I trust anyone who tries to follow this guide will use some common sense. I won’t pretend like this build is optimized for ease or cost - it is just a recreation of what I have made and I am wide open to suggestions and corrections. As a disclaimer, I take zero liability for any damage or injury to you, your plants, or whatever location you implement this design. I am still a novice myself and cannot provide you troubleshooting help or support.
With that out of the way let’s do this. First, here’s what you will need - one of each unless described otherwise:
Description
Link/Source
Cost
Pi starter kit w/ NOOBS pre-loaded. Has everything needed to get started.
Solderless breadboard, for pre-assembly and testing of electronics. OPTIONAL IF you are confident with soldering all connections to the permanent breadboard (below)
HY-SRF05 SRF05 Ultrasonic ranging module Ultrasonic sensor for reservoir sensor - will require two additional resistors to avoid damage to the Pi! See guide for details.
Raspberry Pi Model 3 B+ starter kit - HAS BEEN SUPERSEDED BY THE MODEL 4, kits available ~8/15/19
$79.99
There are many commonly owned materials on the list which can significantly cut down on the cost of the project - copper wire, for example. Beware substitutions (like alibaba or ebay equivalents) at your own risk.
Step 0: Tips
READ THIS ENTIRE GUIDE BEFORE PURCHASING ANY PARTS OR ATTEMPTING ANY STEPS.I cannot stress this enough. If you read through this guide and it seems too complicated, you should probably hold your horses and do some more reading or practicing on the fundamental subjects. You also may read something that confuses you, but makes sense once you read subsequent steps.
Step headings contain links to the guides I used when finding my way through this project. They helped a lot and that is why I linked them. They said it better than I possibly can so use them - I will provide specific insight where I can from a novice’s point of view.
Remember to run wires through the control box housing as you are building the unit, or plan on building outside the box, then rebuilding inside it. I encourage building outside the box for those who are less experienced.
Make permanent wire connections when your design is finalized. Solder wires in place, use screw terminals, wire nuts, wagos, etc. Do not twist wires together and cover in electrical tape, do not leave all your wires plugged into a breadboard, etc… this only causes intermittent and inexplicable behavior for the control box at best, or catastrophic shorts, failure, or fire at worst.
You may want to opt for the more powerful Raspberry Pi Model 3 B+ [Note: as of 6/24/19 the Model 4 has superseded the Model 3 B+, however I have not attempted to build nor run this program on either Model 3 or 4 and make no guarantees for its compatibility] for this application. My original intent with the Pi was to run basic python scripts, but as I learned it was capable of much more, I wanted to add that functionality. At times, the Pi Zero may bog down, the dashboard web page may be unresponsive for a few seconds, etc. and you cannot run the Chromium browser via the desktop UI while also hosting the Node-RED server since the Pi Zero does not have enough RAM. I personally believe that a Model 3B+ or a Model 4 could run the Node-RED server, the desktop UI, Chromium browser, and VNC server with ease. This would make the UI accessible from any device, anywhere with an internet connection.
Step 1: Assemble the Pi kit
Solder the header pins to the Pi if needed. Put the SD card in, plug in the power, the USB hub, the keyboard and mouse, monitor, and boot up the Pi.
Use NOOBS to install Raspbian operating system. You can opt to use a desktop interface if you’d like, but if using a Pi Zero you will not be able to both host the Node-RED server and use a browser on the Pi to edit it very effectively due to RAM and CPU constraints. The desktop UI may still be easier for newer users to navigate during installation, and can be disabled at boot-up to preserve RAM once installation is complete. Enable SSH access as well, using the "raspi-config" command from the prompt.
This might even come before step 2, but by the time you get to the desktop you should be able to set up network connections, either hardwired or wifi. Find your local network, and connect to it.
Some installations of Raspbian have Node-RED installed by default, from what I’ve read. If you have it installed, skip to the part in the linked guide where it shows how to launch the Node-RED server and start it on bootup. Once the installation is complete, start the Node-RED server on the Pi and navigate to the IP address of the Pi, port 1880 like this: http://192.168.1.9:1880
Be sure to set Node-RED server to start on bootup with the Pi, as it will eventually be running "headless", aka with no monitor/keyboard/mouse.
Palettes are like script libraries in other languages. Kind folks before us have done the hard work of decoding the interfaces with many different sensors, as well as nodes to simplify the programs (flows) and even add a dashboard UI which we'll need. Install the following palettes using the linked instructions:
node-red-contrib-dashboard
node-red-contrib-dht-sensor
node-red-contrib-bigtimer
node-red-contrib-moment
node-red-contrib-ui-led
node-red-contrib-pigpiod
At this point we’ll pause on the software side to do some wiring, so feel free to explore in Node-RED and familiarize yourself with it.
Step 6a: Drill wiring holes in the box
You will need to drill or Dremel out two (or more) holes in the side of your control box to accommodate the strain reliefs. Slide the strain reliefs into the holes and tighten them down. Loosen the clamps or remove entirely but keep nearby. One hole will be for the AC main power, one hole will be for the DC power in, and all signal wires. You can run the USB hub wire through this hole as well, leaving the USB ports exposed on the outside of the box. This may come in handy if you ever need to plug back into the Pi after initial setup.
Time to start wiring. First, you’ll have to strip the CAT5 cable and pull out several feet of the wire pairs inside. I'm sure this can be done much simpler, but I wanted color coded wire pairs and didn't want to buy 8 spools of 23 gauge wire. Substitute with different type of wire if desired. Then, wire up the DHT22 sensor with 3 nice long leads of wires from the CAT5 cable. The wires will need to reach from the control box into your grow area, where the sensor will be placed. Wire the sensor up to the Pi at the GPIO pin designated on the wiring diagram in the Appendix.
This is the sensor used for reading the reservoir level - if you don’t have a reservoir or don’t want to monitor/log the level, skip this section. Otherwise, follow the linked instructions up until the “Python Script” section. Wire the sensor according to the diagram in the Appendix of this guide. Do not forget the resistors for the voltage divider or the 5V signal will damage your Pi! Make your lead wires long enough to reach your reservoir as with the DHT22 sensor. When mounting the SRF05, make sure the emitter/receiver are pointing straight downward at the water. Any angular tilt will distort the readings and make them less accurate.
Follow these instructions to import the program. After importing and deploying the code, you should be able to navigate to your UI dashboard. If your wiring has followed the wiring table diagram, you should see readings being collected from the Pi for temperature and RH, and see VPD being calculated! But now it’s back to more wiring…
Step 8: Wire the relays and outlets
WARNING - INVOLVES MAINS VOLTAGE WHICH IS POTENTIALLY LETHAL! I AM NOT AN ELECTRICIAN! MY DESIGNS ARE NOT UL CERTIFIED! DO NOT MESS WITH THIS STUFF IF YOU ARE INEXPERIENCED!
You will need to wire the relay board to the AC outlets as well as DC & relay signal control from the Pi. AC wires should be the positive (+), or LIVE, or HOT (usually red or white) wires coming from the main to the relays, and going from the relays to all of the sockets. You should wire the relays in the “Normally Open” (NO) orientation. This way if all voltage from the Pi cuts out, everything shuts off for safety.
I wired all negative (-), or NEUTRAL, or COMMON wires together, and all GROUND or EARTH wires together. Always use reliable, insulated connectors to connect multiple 14-16 gauge wires. I highly recommend using wago connectors over wire nuts, as they are infinitely easier to work with. If you’re using solid core wire, your outlets are probably floating above your relay board by this point, held up by the numerous wires. I recommend writing the relay numbers on each outlet with a sharpie.
Relays wired to outlets. Below you can see the box lid with cutouts stenciled for the outlets.
You’ll want to wire one additional pair of outlets, directly to the mains power line and not through a relay. This outlet will be always-on, and used just like a wall outlet to power your Pi and perhaps one other outlet-fed device.
But wait, there’s more! Wire the VCC to the 5V rail of the Pi, and GND to the ground rail. All other control pins should run directly to the Pi GPIO’s, as labeled on the wiring diagram.
Control voltage, ground, and signal pins that go back to the Pi GPIO’s. Note pin 2 (relay 2) isn’t used in my configuration. I joined the two outlets so the lights would always run together off relay 1.
Step 9: Wire the dimmers (optional)
You must have PWM controllable drivers for this method to work. You will need to wire from the Pi PWM pins to your MOSFET unit, as labeled on the wiring diagram (see appendix). Use more wire from the CAT5 cable to connect to your drivers’ DIM+ and DIM- leads. Accommodate distance between your control box and the drivers with a longer stretch of wire, similarly to wiring the DHT22. If you have multiple drivers, I recommend using one of these MOSFET units for each driver though one PWM signal can drive both.
The MOSFET dimmer board as mounted in the control box.
Step 9b: Set up the dimmers (optional)
PWM on the Pi is hardware-driven only on a few pins, and the code / wiring table are designed to utilize one of those pins so that the lights do not flicker as they would with software-driven PWM. But for the dimmers to work properly, you will need to do two things:
First, have the “pigpiod” daemon running in the background. Luckily, this should already be installed with your default Raspbian OS installation. The best way to ensure that the daemon starts and runs each time the Pi boots is by using a built-in program called “crontab”. From the Pi command line, enter (without quotes): “sudo contab -e”. This will open crontab for editing. Add a line below any existing lines that says “@reboot /usr/local/bin/pigpiod”. Press Ctrl-O to save changes, and Ctrl-X to exit. Then type “sudo reboot” to reboot the Pi, and pigpiod daemon should be running.
The second thing you’ll need to do is enable Remote GPIO on your Pi. From the console, enter “sudo raspi-config”, and navigate to Interfacing Options > Remote GPIO, and enable it. You will be prompted to change your password at this time, as leaving the default pi/raspberry username and password is especially risky if remote access can control the inputs/outputs of the Pi.
Step 10: Test the program with relays & dimmer
Boot up the Pi and navigate to the dashboard UI on your PC. You should be able to toggle all the relays on and off using the manual controls, as well as setting limits for temp/humidity and manipulating the sensor to trigger them. For example, hold the sensor in your hand, set the max temp for 80F, and wait for the exhaust relay to come on. If any relays are not triggering as intended, troubleshoot the wiring but TAKE CAUTION when dealing with the AC wiring and DO NOT TROUBLESHOOT WIRES WHEN THE UNIT IS PLUGGED IN.
If installed, test the dimmer by plugging in your driver to the lights relay, flipping the relay on (either manually or via the timer), and sliding the dimmer switch to various points. The dimming setting is only set when the slider is released, not in real-time.
Step 11: Cut outlet holes and mount outlets
Using the 4 gang faceplate as a stencil, trace the holes you’ll need to cut out of the lid to mount the outlets. Also mark where the screw holes will go. Use the 1 gang faceplate to trace the cutout for the always-on outlet. Use the Dremel with the cutting bit and the router guard to keep the bit square, and cut out the holes for the outlets. This part will be messy - plastic chips will fly everywhere. Keep a shop-vac handy and don’t do it somewhere you don’t want getting messy! Mount the outlets to the box lid, and mount the faceplates over the outlets.
Outlets mounted to the lid. I used a GFCI outlet for my lights since I had it laying around. In hindsight I probably should not have, since the startup current of the drivers could potentially trip the breaker in the outlet.
Step 12: Mount the Pi, breadboard, and other modules
Time to mount the small electronics into the box - I recommend using double sided foam tape to insulate the circuitry while adhering it. I am terrible at project box layout, so I apologize but I don’t have a suggested way to mount the hardware. You’ll ultimately need to fit in the Pi with case, the relays, the breadboard, and the dimmer MOSFETs. All the wires (especially the AC wires which are hard to bend) may make it difficult to close the box, but take care while doing this as not to pinch or break any other wires.
Step 13: Close the case and tighten the strain reliefs
Fit the lid onto the box and snug down the screws. Gently tighten the strain relief clamps down around the wires so they do not move freely, but not so tightly that they are pinched.
Side view of the box, closed and with the strain reliefs snugged up. Note the USB hub is left dangling outside the box in case needed for hard wire hookups later on.
Step 14: Test all functions
Boot the Pi back up, and repeat all the testing steps. Switch all the relays on and off manually while listening for the click, or do it with a device plugged in (a basic lamp works fine). Make sure all sensors are reading accurately, data is being logged, etc.
You should now have a fully functioning control box! If you followed my wiring tables and diagrams exactly, and you have exactly the same sensors and devices, everything should be working as intended. If you want to make customizations such as using Celsius, changing scales on the gauges or charts, reorganizing the dashboard, etc… go nuts. But I am not going to write instructions on how to customize every single bit of it, because all of it can be customized. So I encourage you to learn more about Node-RED and its capabilities. If you already know JavaScript, you’ve got a huge advantage.
This is what my finished box looks like - I ended up plugging a kill-a-watt into the light outlet to gauge wattage while setting up my UI. The other plugs are circulation fans, exhaust fan, and humidifier. Not the prettiest, but she does the job well.
Step 99: Customizations
Everyone’s setup is a little bit different - different spaces, different lights, different humidifiers, exhausts, fans, etc. Therefore there are some customizations that you will need to know how to do for your controls to work properly. Such as…
Temperature and RH offset for calibration:
If you find your DHT22 is not accurate for temperature or humidity, you may add a constant offset to the value to read accurately.
Go into the “temperature” function node:
Add or subtract an amount to the +32 value (for Fahrenheit), or delete the “*1.8+32” portion to return the reading as Celsius and add a +/- offset in C (note, other gauge legends and tooltips will still say F even if the values are C).
Go into the “humidity” function node:
Enter a +/- offset as shown here - this example has a -12% RH offset.
Leaf temperature offset:
Leaf temperatures are naturally a bit cooler than the surrounding air, due to transpiration. Since VPD should be calculated based on the temperature at the leaf surface, we will need to offset the sensor reading to have VPD calculate appropriately.
Go into the “calc VPD” function node:
The leaf temperature offset value on line 1 can be modified. Example shown is -1 (values in Celsius) and leaf temps are typically 1-2C cooler than the air. Also be sure to enter the same RH offset in this formula on line 2 as you entered in the humidity function.
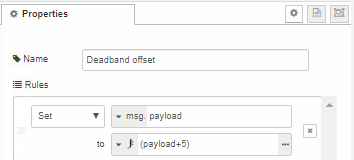
Humidifier Deadband offset:
This offset allows the humidity to go X% above the “Max RH” before the exhaust kicks on. The humidifier will turn off exactly at the Max RH, but humidity may take a few minutes to come to equilibrium, which often results in overshooting the Max RH by a few %. The offset is set to +5% in the example shown below:
Change the +5 value to whatever you would like the deadband to be.
Lights Wattage Scaling:
This scaling is to show the approximate wattage of your lights when using the dimmer. This will require some data collection on your particular setup, and a Kill-A-Watt meter or similar. Plug the lights into the meter, and record the wattage at every 10% of PWM as you increment the slider via the dashboard. In my experience, 90-100% scales MUCH more rapidly, so I would gather wattage at 1% intervals 90-100%. Enter this data - PWM % and Wattage - into Excel, plot a X-Y scatter plot, and add a trendline as Exponential. Show the trendline equation in the graph.
Now, go into the “Scale PWM to Wattage” node:
And modify the formula to match your trendline formula. JSONata uses the markup “$power(base, exponent)” for exponential equations. The constant “e” is approximately 2.71828, which is more than precise enough for this application. So if your excel trendline formula was: y = 32.953e0.0276x
then the JSONata expression would be:
32.953*($power(2.71828, (0.0276*(payload)))
The resulting formula in the node will look like:
Lastly, you'll have to go into the "Wattage" gauge UI element and adjust the scale min & max to reflect your lights' true minimum and maximum wattage.
Appendices:
Wiring Block Diagram
Pi Pinout Table
Dimmer Module Wiring
Ultrasonic Distance Sensor (SRF04/SRF05) Wiring
]]>
https://pexpeppers.com/blogs/pepper-growing/how-to-grow-hydroponic-peppers2020-03-18T02:07:00-06:002020-06-09T11:12:52-06:00How To Grow Hot Peppers In HydroponicsGarrett PeckThis is How To Grow HOT PEPPERS In Hydroponics.
There are many different types of hydroponics setups, a few of them are: DWC (Deep Water Culture), Ebb and Flow (flood and drain), NFT (Nutrient Film Technique), Aquaponics (sustainable relationship using fish and plants), and more! We are going to be going through DWC systems today for our hot peppers. It is called deep water culture because the roots are suspended in a light nutrient solution that has an aquarium air stone in it to oxygenate the water so the hot pepper plant can actively uptake nutrients to grow. For a basic pepper growing DWC system you will need the following:
In most regions of the U.S., ghost peppers will need to be started indoors 10-14 weeks prior to the last frost for your area. They need around 5 months (140+ days) of very hot and humid weather in order to succeed and will not tolerate any temperatures below 73° F. Your soil temperatures must be around 80° F – 90° F for successful germination. A geographical location with about 70-80% humidity is also ideal for growing ghost peppers.
Growing Location
To have a chance at growing a successful ghost pepper plant, you need to recreate the harsh environment of northern Bhutan, India. This means that outdoor growing in the U.S. may only be possible for regions 5a-11b. Raised beds or very large pots are ideal for ghost peppers because the soil will be much more warm and will stay that way. Choose an area of your secret garden that receives as much sunlight as possible for as long as possible. Bhut Jolokia (ghost) Peppers can be grown indoors if all ideal conditions are achieved. This will mean grow lights in a room separated from the rest of the house so temperatures and humidity can be kept high.
BEST SOIL FOR GROWING GHOST PEPPERS
Ghost peppers need a loamy soil. A peat containing soil tends to work considerably well. When growing ghost peppers you will want to avoid heavy clay and potting mix like miracle grow. The soils pH should around be 6.0 – 6.8 in order for nutrients to not get locked out causing a plethora of problems. It is always a great idea to amend your soil with compost, bonemeal, and fish fertilizer prior to transplanting. This will normally guarantee the plants will have the nutrients they need properly.
PLANT NUTRITION Ghost peppers benefit from a regular diet of organic nutrients or compost tea. You will want to avoid high nitrogen fertilizers. The plants will look nice but your peppers wont be.
PLANTING Starting seeds is the first tough thing to accomplish when trying to grow Bhut Jolokias. For best results, you should consider germinating your seeds indoors. You will need to soak the seeds in water overnight before sowing. plant one seed in each compartment of your seed starting tray. Provide constant bottom heat, such as from a heating pad or the top of your refrigerator. The soil temperature must remain steady around 80° F – 90° F for successful germination. Keep the planting medium moist, but never sopping wet. You will need to keep out of direct sunlight until the first sprouts appear from the soil. You may cover the top of your seed starting container with plastic to help maintain moisture in the soil. Germination should occur around 7-21 days but can take up to 40 days, so be patient and don't cry. You should transplant seedlings into 3 to 4-inch plastic pots as soon as the second set of true leaves appear on your plant. Please do not transplant outdoors until temperatures reach a constant 70 degrees F or higher, even at night. When you are ready to transplant outdoors you will have to harden off your seedlings. This means bringing them into the outdoor environment very slowly so they get used to fluctuating temperatures and higher amounts of light.You will need to place the seedling pots outdoors during the day for a couple hours the first day adding an hour or so every day after. Do this for about ten to twelve days. On the 10th day you should leave them outside overnight. The next day you should transplant into some moist soil before it gets too hot outside. Transplant seedlings 2-3 feet apart.
WATERING & CARE Water on a schedule. Give them a good long soaking about twice per week during dry periods. Keep the soil moist but not drenched or saturated. The best times to water are early in the morning or after the sun starts to set. NEVER water during high noon or you are asking for your plants to get cooked You will also want to keep your ghost peppers free of weeds and other nasty things.
POLLINATION Proper pollination is key to growing successful ghost peppers. Try to introduce bees and other beneficial insects by growing lots of flowers in your garden. Make sure the peppers are grown in a spot with good air circulation and spaced properly. If you are not noticing lots of beneficial insects in and around your pepper plants and if they are producing flowers but not fruit, you may need to hand pollinate. Use a small, clean paintbrush and gently brush the center bud of each flower. The idea is to spread pollen from flower to flower.
HARVESTING Your ghost peppers will change from green to orange and then to a brilliant striking red when they are ready to be picked. You will always want to wear gloves while handling your new ghost peppers and remember avoid contact with the face or eyes AND KEEP AWAY FROM CHILDREN. You can pull them directly off the plant or you can cut their vines.
Other Thoughts Ghost peppers can be very tasty if you use them in proper ways. I personally enjoy smoking ghost peppers over a nice bed of Apple Wood! Please treat ghost peppers and hotter peppers with respect, they can seriously hurt you if you do not know what you are doing. Super hot peppers are NOT to be used as pranks and are to be used responsibly. From pest deterrent to supreme culinary works of art, ghost peppers are a great tool. A suggested use is to make your very own hot sauce! A lot of people only know one way of growing plants and that is in soil.
Growing Peppers In Hydroponics
Did you know you could grow in a water and nutrient solution? Beginning your own hydroponic system will help you learn why plants need particular nutrients and growing environment as well as giving you the best from your plants. Why do you want to grow in hydroponics? Lets take a look at some pro's and con's. PROS:
More control over growing environment
Better nutrient uptake directly correlates to better yields, hotter peppers, and better tasting fruits.
Faster growth.
Semi-pest resistant
Cons:
Can get expensive
First you need to get yourself a 5 gallon bucket at your local hardware store. Black or dark blue is preferable so you dont have to deal with algae problems that you would have if you used white 5 gallon buckets. Take your net pot lid and drill a 1/4 inch hole in the top about 1.5 inches away from the center like so. After completing this step, run your air tubing from the air outlet of your pump to the air stone while passing through the hole you drilled in the net pot lid earlier
ill with water to the bottom of the net pot like so and add nutrients to water. Follow the directions on your chosen nutrients (THEY MUST BE HYDROPONIC NUTRIENTS, NOT MIRACLE GROW)
Put a seed in the rapid rooter in its proper orientation making sure the seed hole faces up.
Place rapid rooter into the net pot and surround it with hydroton Turn on the pump and grow light and for the first 8 weeks of the plants life set the light to 18 hours on and 6 off. This should be enough information to get you started with your very own hydroponics DWC setup! So get out there, research more on it and come on back and we will explore more about hydroponics.
]]>
https://pexpeppers.com/blogs/pepper-growing/how-to-clone-peppers2020-03-18T00:01:00-06:002020-06-09T11:13:41-06:00How to Successfully Clone Chile Pepper PlantsGarrett PeckCloning pepper plants is not rocket science. All you need to do is follow these video steps and have the following tools.